WARNING Objects in this post may seem more confusing than they really are.
This post is not to teach you everything you ever wanted to know about a SERT. Instead it is to give you some insight into what a SERT is and what to expect. The SERT version used is 4.12. If you have specific question about the SERT, I would suggest you download the PDF file at the end of the post, it is the SERT manual.
This is my take on the cost. You pay a little more for the EFI bikes. Then you buy the SERT. If you bought a bike with a carb and wanted to do performance mods, most likely you would be buying a new carb to the tune of about $400. You would also need a new ignition module, another $200. If you didn’t like the results or achieved unexpected results and wanted to try something different, mo money, mo money, mo money. With the SERT if you don’t like the results, you just upload another MAP.
The SERT is a program that you load onto a desktop or laptop computer. It allows you to modify all aspects of the fuel and ignition control module called an ECM. A nice part of the SERT is that you can play with the MAP’s anywhere. If you have it loaded on your laptop and you are at work bored for instance you could mess around with a MAP and save it for later.
Another bonus with the SERT is how easy it is to load a MAP. You simply plug the computer into your bike and upload it. It is very fast and easy. I can upload a new map quicker than you can get the air cleaner off a carb, let alone remove the float bowl and the jets.
There are some issues with using a SERT. The first one is getting your SERT to communicate with the bike. The first time I used one it would not work with the ECM. It gave an error trying to read the VIN number of the bike. If you have this issue you need to take the bike to a dealer and have them reload your VIN number into the ECM. Convincing the dealership mechanics that this is all you need, will be the next problem. This problem seems to be in the earlier model Delphi ECM’s, 01-03.
In this thread we will be using the word MAP and it will refer to two completely different things. The first meaning of MAP as used up to this point is like a road map. Depending on where certain conditions are met, it tells the ECM what to do or where to go like a road map. The second MAP stands for Manifold Absolute Pressure. Try not to get too confused between the two. (note one sentence using to, too and two).
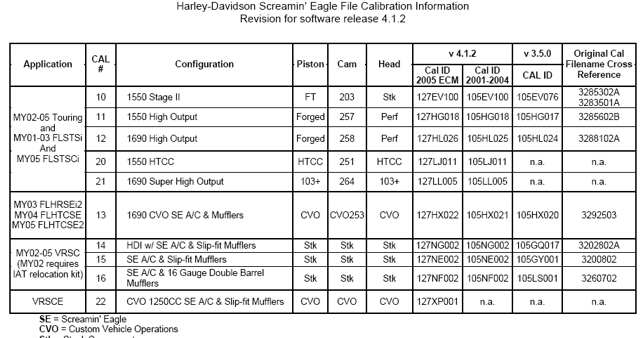
After you install the SERT and the user manual, you will have 2 PDF files on your desktop. One is called “Race Tuner Cals” and contains some basic engine setups. Choose the one that most closely matches your build. This is your BASE MAP. When using Big Boyz Street Heads, we recommend selecting a setup that uses SE Performance heads in the configuration.
Here is an example of what the chart looks like.
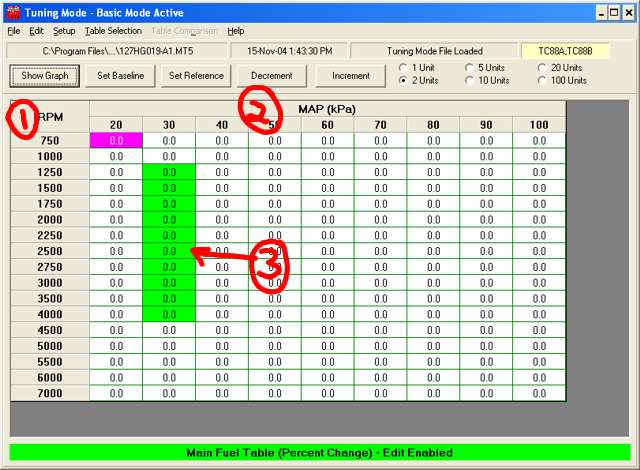
After selecting the base MAP for your build and opening it, you will see a screen like the following picture. The base MAP opens in “Basic” mode. In Basic mode all the numbers on the MAP chart are 0. The zero represents the default setting and then can be changed by PERCENT. I personally don’t like this mode.
1) Indicates the RPM range
2) Is the MAP (Manifold Absolute Pressure)
3) Green table values indicate LOW Limit (can’t adjust any lower)
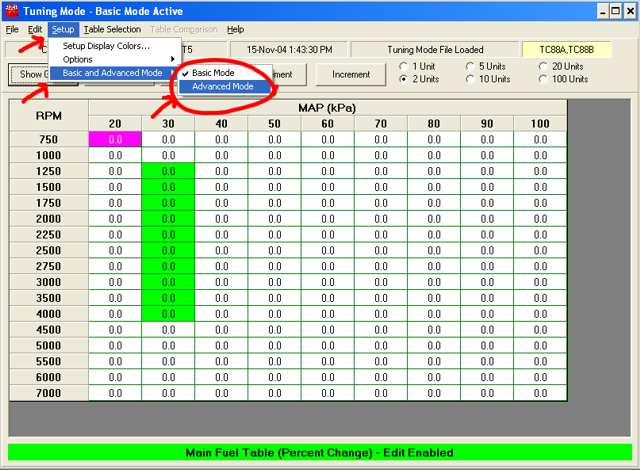
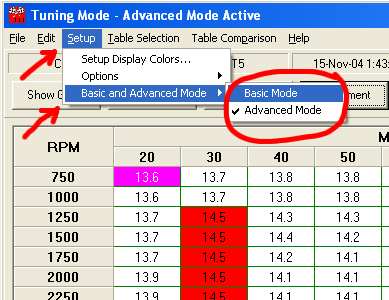
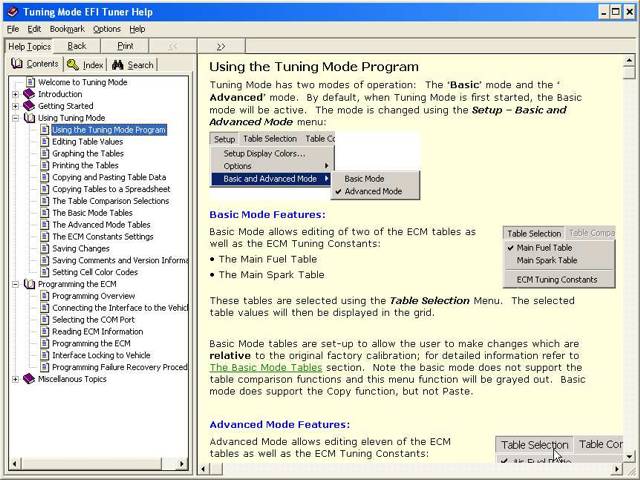
To change the Mode from Basic to Advanced (next picture), go to “Setup” --> “Basic and Advanced Mode” --> select “Advanced Mode”
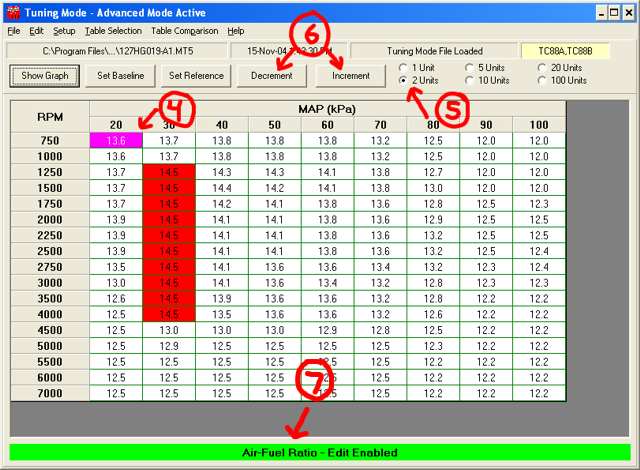
In this mode you now see the Air/Fuel ratio numbers instead of the percentage change numbers. Note the RED blocks, RED indicates HIGH limit reached and can not be adjusted higher.
4) Purple indicates SELECTED area. More than 1 block can be selected and changed at a time.
5) Indicates the amount of units changed when modifying the selected area.
6) How you change the selected area, hit the button and the selected area is changed by the number of units selected in (5)
7) Title of the MAP you are on, in this case Air/Fuel Ratio
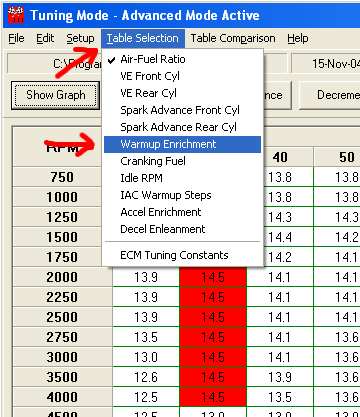
Now if you go to the “Table Selection” menu (picture below) you can see all the different tables that can be adjusted. I selected “Warmup Enrichment”
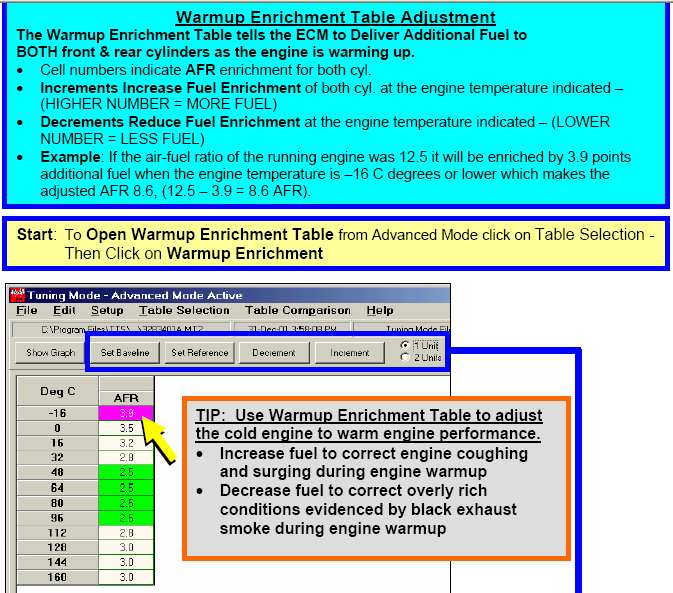
In this screen you can see that you can select the amount of enrichment based on engine temp.
8) Indicates what table you are on
9) Adds lots of fuel while the engine is cold
10) Normal operating temp
11) Adds fuel if the bike is too hot, this can help cool the engine down.

In the SERT manual (PDF file attached at end of post) they have easy to understand descriptions of all the tables and the adjustments. Following picture is an example that goes with the above “Warmup Enrichment” table.
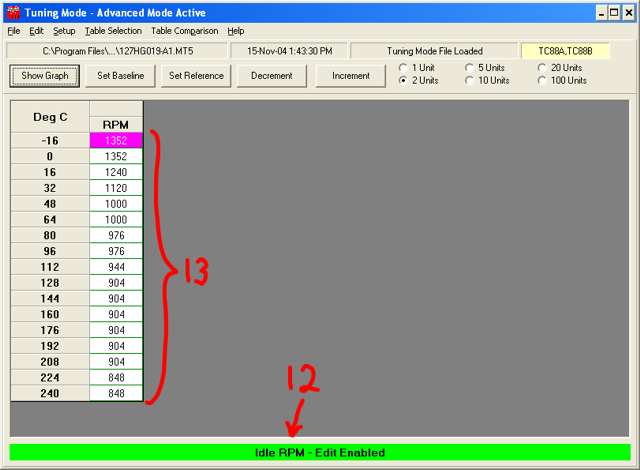
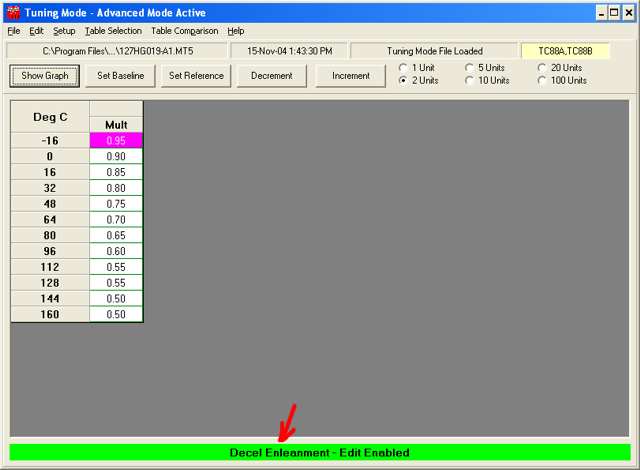
Using the “Table Selection” list I changed the table to Idle RPM
Again you can see that the table is based on Engine Temp.
12) Table selected, Idle RPM
13) Engine Idle selection at specified temp
As described above, you select the block or blocks (purple color) and set the Idle RPM using the “Units” selected and hitting the “Increment” or “Decrement” buttons
14) Title of table, I keep pointing this out since it tells you what you are adjusting
15) Indicates it is a Multiplication table based on engine temp
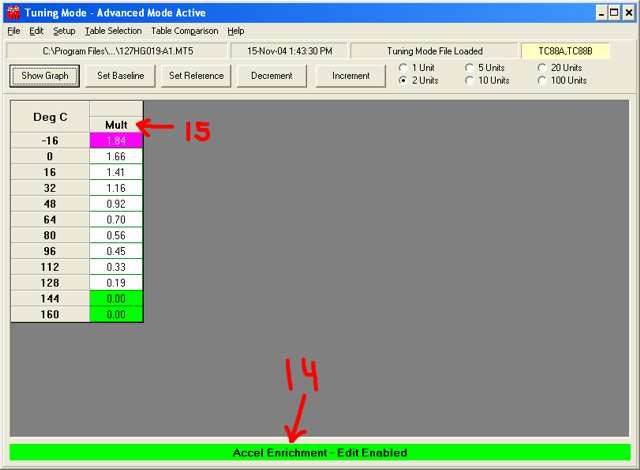
By now you should be able to look at the next picture and without any additional information have a pretty good idea what it is all about.
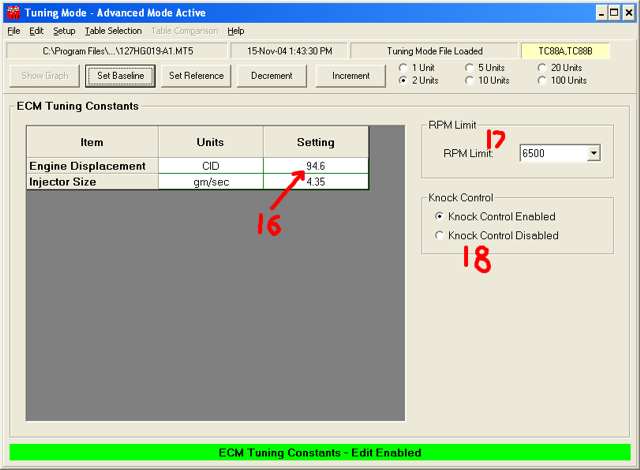
This next screen, again selected using “Table Selection”, sets up your ECM Constants.
16) Engine displacement
17) Rev Limiter
18) Knock control, which can be used in tuning the engine. You turn it off so that it doesn’t change any setting to compensate for knock.
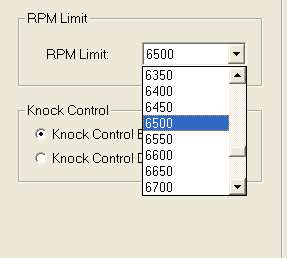
Rev limiting adjustment, note 50 RPM increments
To go back to Basic mode.
Select “Main Spark Table”
19) Green indicates LOW Limit
20) Indicate the Table change is a percentage
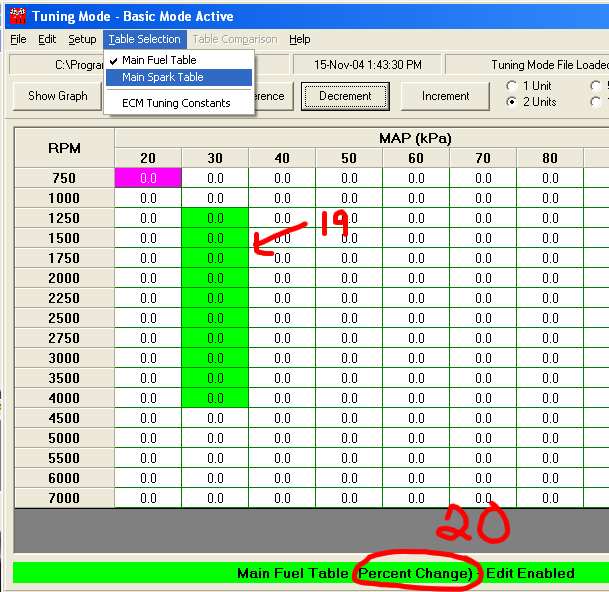
The Main Spark table adjusts the Timing based on RPM and MAP (Manifold Absolute Pressure)
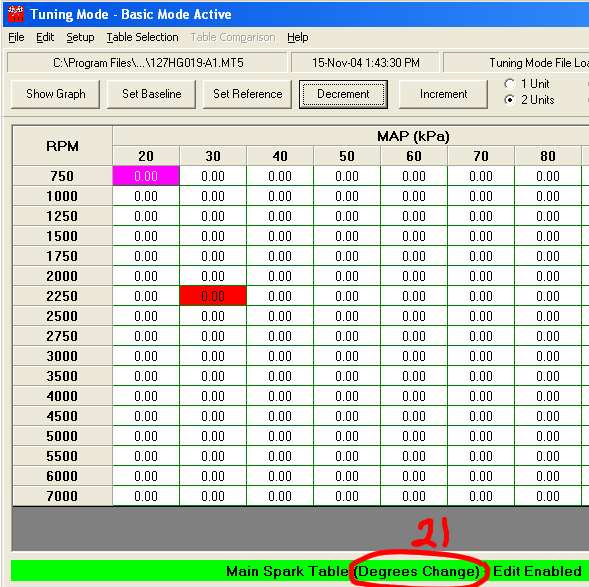
21) This table is adjusted in Degrees (as all timing is)
Because we are in Basic mode you adjust the degrees from a BASELINE. If you go to “Advanced Mode” you will see that you have 2 tables, one for each cylinder. And in advanced mode the table is displayed in degrees of timing and not from a Baseline. I find it easier to adjust the “Main Spark Table” in “Basic Mode” but for even greater flexibility use “Advanced Mode”.
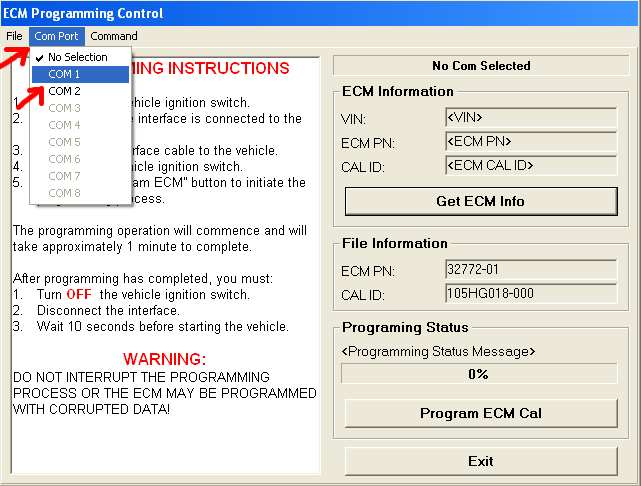
To actually program the ECM with your newly adjusted MAP, go to “File” menu and select “Program ECM”

To program the ECM you must first select a COM port that you will use to communicate with the bike on.
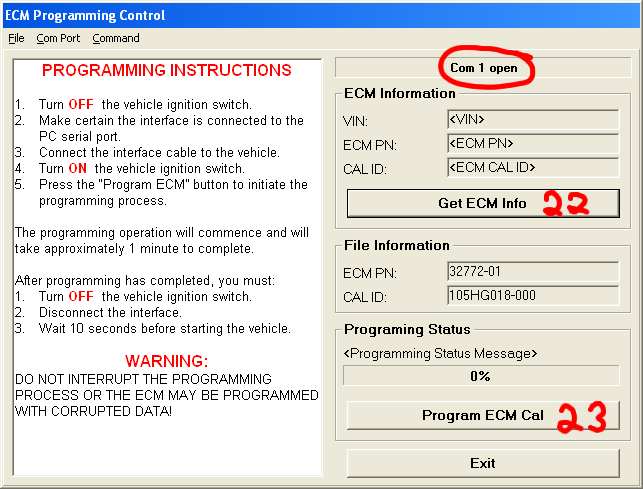
It will show the COM port selected.
22) Get ECM info returns the VIN number
23) Sends the MAP to the ECM
Go to “Help” menu and select “Contents”
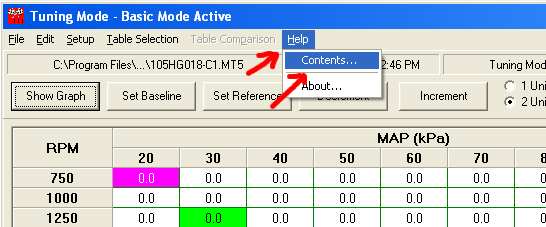
In this screen shot you can see that the Help section is VERY GOOD. And it covers many topics. DON’T BE AFRAID TO USE THE HELP !!!
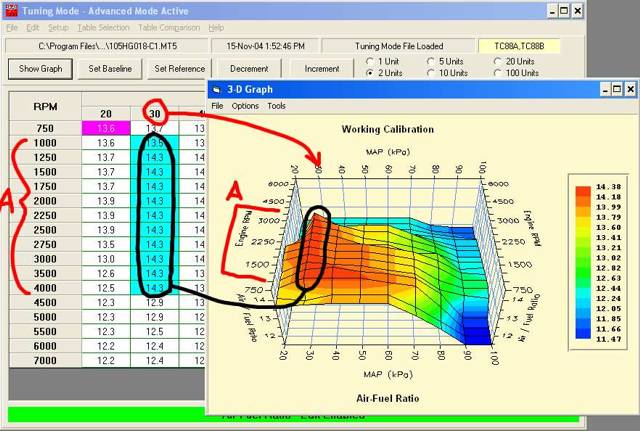
On most if not all the tables, you can use the “Show graph” button and it will generate a graph so you can visualize the changes. In the example below, I am in the Air/Fuel Ratio table. Some of the charts are presented in 2D and others in 3D.
Section “A” shows the RPM. The Black circled section shows the AFR for the corresponding MAP of 30 kPa. The 3D graph should be somewhat “flowing”, if in the middle of the red section you had one spot that was blue, it would indicate at a glance that a number might be typed in wrong.
A part of the SERT that I didn’t go into is the Data Recorder. The SERT has the ability to monitor and record what’s happening while the engine is running. You can use the data recorder to help with tuning the bike. I have never used it but it is my understanding that you need to hook a laptop up to the bike and drive around with the laptop recording the data. Typically you here people say that you need a laptop to use the SERT. Actually you only need a laptop to use the Data Recording part of the SERT. All the programming and adjustments can be made on the average hope desktop computer.
Of course tuning your bike for maximum performance and using a Dyno to see the immediate results in the changes you made can make it easier.
With the use of the Data Mode and the ease of uploading a MAP the average mechanically inclined tinkerer can make changes and if it doesn’t do what is expected they can go back in mere moments.
If you create a new MAP, SAVE IT !!!! There is no limit to how many maps you can save. If you don’t save it you may not know what you did.
There is also a table comparison section that I didn’t go into but it allows you to see the changes you made from the original MAP.